Contents:
- Create a BibTeX File Listing the Publications You Want to Upload
- Import Into the UC Publication Management System
- Upload Your Publications to eScholarship
Now that you’ve worked through Parts 1-3 of this toolkit to select a set of publications, collect copies of them, and sort through their copyright issues, you’re well-positioned to start on the ultimate goal of this project: putting your collected scholarly work online.
You’ll be adding your publications to eScholarship, the University of California’s open access institutional repository and publishing program. UC authors like you have added thousands of previously published works to eScholarship (like these from UC Irvine), and these publications are accessed and read by people all over the world. Once you post your publications, eScholarship will provide you with regular reports of how often they are being read and downloaded from the site.
To put your publications online, you need two things: a collection of files to upload (see Part 2) and accompanying information (metadata) that accurately describes the files so people can find them online. Here in Part 4, we build on the work described in Part 1 to help you gather and provide that information, while avoiding manual data entry as much as possible.
For this stage of the work, you will be using the UC Publication Management System (UCPMS), which makes adding publications to eScholarship a streamlined process and facilitates working in batches. Before getting started, make sure you can log into this system at oapolicy.universityofcalifornia.edu; if you have trouble, get in touch with the publication management system contact for your campus.
Some academic departments have resources to assist authors in using this system, particularly through the use of delegates. A delegate is someone — a graduate student, administrative staff member, or other employee — who is authorized to use the system on behalf of an author. You can learn more about setting up a delegate, along with other common tasks and questions, in the UC Publication Management System help center.
Create a BibTeX File Listing the Publications You Want to Upload
The most efficient way to add publications to the UCPMS is to use a list in the form of a BibTeX file. In Part 1, we described using Google Scholar to export a list of publications in the form of a CSV file you could convert to a spreadsheet. You can also use Google Scholar to export that same list as a BibTeX file.
BibTeX is reference management software for formatting lists of references. BibTeX files are a common standard format for storing reference data, and many different sites and programs use them for importing and exporting references.
On your Google Scholar profile, check the boxes of the publications you want to upload in your current batch of work. Once you’ve checked boxes, an EXPORT option will appear above your publication list. You can use the check box at the top next to TITLE to select everything, but be aware that it will only include the first twenty or so publications unless you scroll down and click SHOW MORE.
If you select BibTeX from the EXPORT option in Google Scholar, it will take you from your profile to a page of text. You will need to save this as a BibTeX file. One way to do this is to right click on the page, select “Save As,” and then change or add the file extension to “.bib” in order to save the file as, e.g., “citations.bib” rather than “citations.txt.” Another way is to copy the text and paste it into a plain text editor like Notepad or TextEdit, and then save the results as something like “citations.bib.” The important thing is that you save it as something “.bib,” not “.doc” or “.txt.”
As discussed at the end of Part 1, if you’re not going to use Google Scholar, you could use another service that allows you to export a list of citations as a BibTeX file (e.g. Web of Science or ORCiD). If you can’t tell how to export a BibTex file from your preferred service, contact your campus library.
If you’re not already using a database or citation management service to maintain a publication list, you could try one of Paperpile’s conversion tools, or use AnyStyle (as outlined in the Publication Management System help center) to create a BibTeX file from a reference list. These automated tools will be faster than typing out a BibTeX file from scratch, but they may make mistakes or miss some references. This approach will require much more manual work on your part than exporting from somewhere like Google Scholar or Web of Science.
Import Into the UC Publication Management System
To import your publication list into the UC Publication Management System (UCPMS), you must first log in using your campus account.
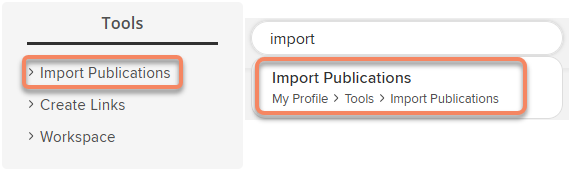
Once you are logged in, navigate to Select Menu > My Profile > Tools > Import Publications or type “Import” in the navigation search bar (quick link: https://oapolicy.universityofcalifornia.edu/import.html).
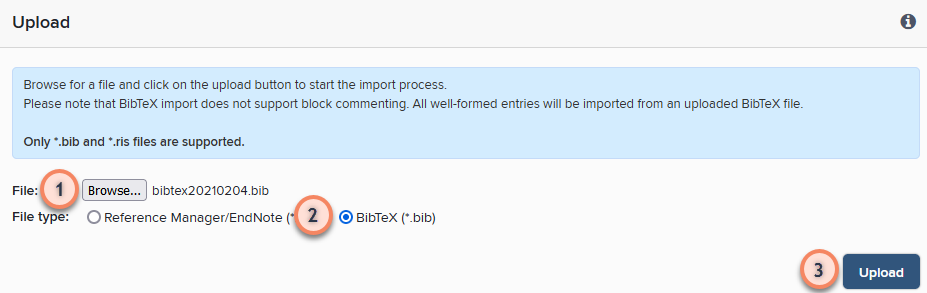
To upload your BibTeX file:
- Use the Browse button to locate the .bib file with your current list.
- Select the BibTeX option
- Select upload
Note: It may take several minutes for the system to process the file you’ve just uploaded. Please be patient and do not close your browser window.
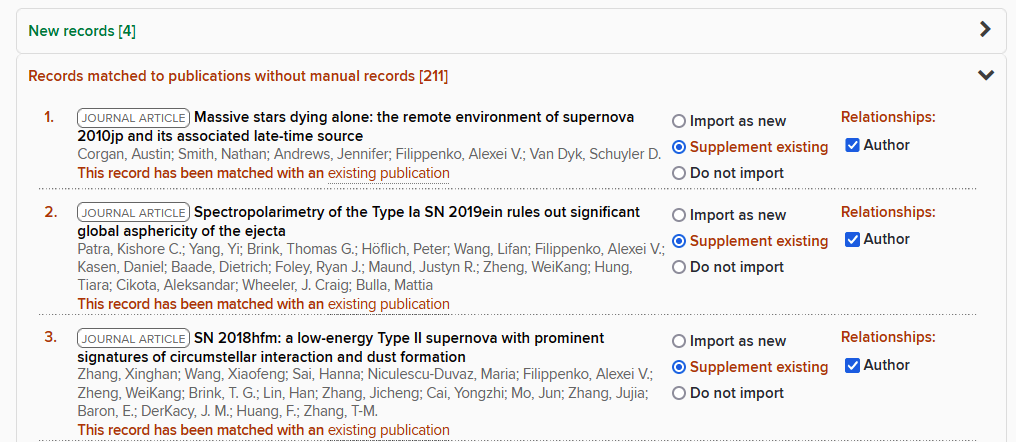
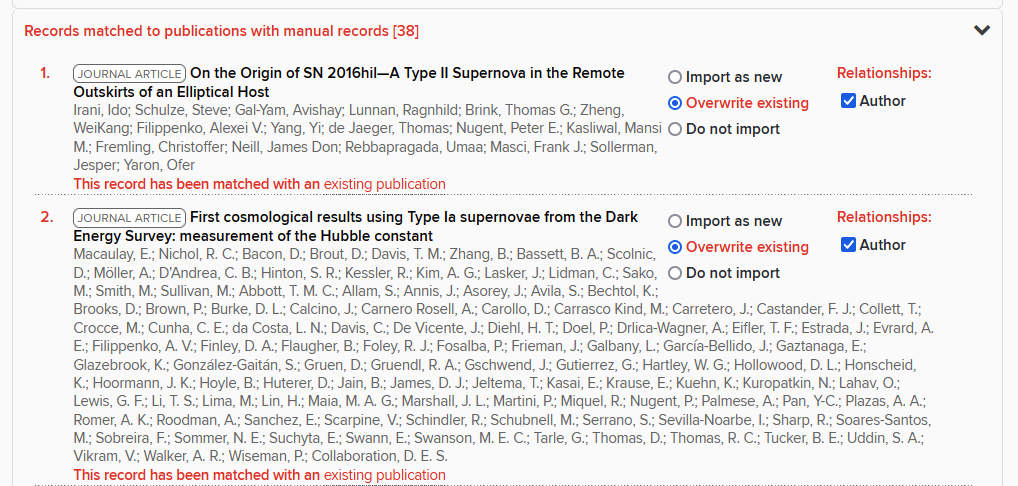
The system will display the publications imported from the BibTeX file in one to three lists, depending on which types of record it has found:
- “New records,”
- “Records matched to publications without manual records”, and
- “Records matched to publications with manual records”
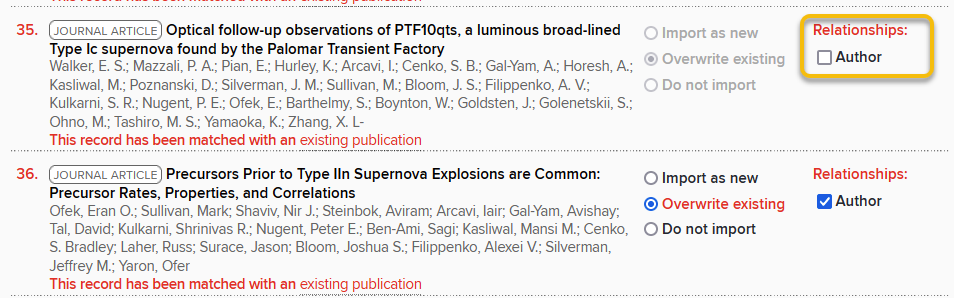
These list names are explained below. Take a moment to review the list to verify that the data looks correct, and to deselect any items that you do not want to import.
Check each list for duplicates or incorrect author relationships. It’s okay if you miss a few – you can always remove them from your publication list later.
The “Relationships” column describes your relationship to the publication: Author, Editor, Translator, or Contributor. In most cases, this should be Author. If an item that you did not author is listed in the column as “Relationship: Author,” uncheck the “Relationship: Author” box.
New records: The UCPMS regularly checks publication databases and searches for work by UC authors. The items in this list are publications that the UCPMS has never found. If they look correct, they can be safely imported.
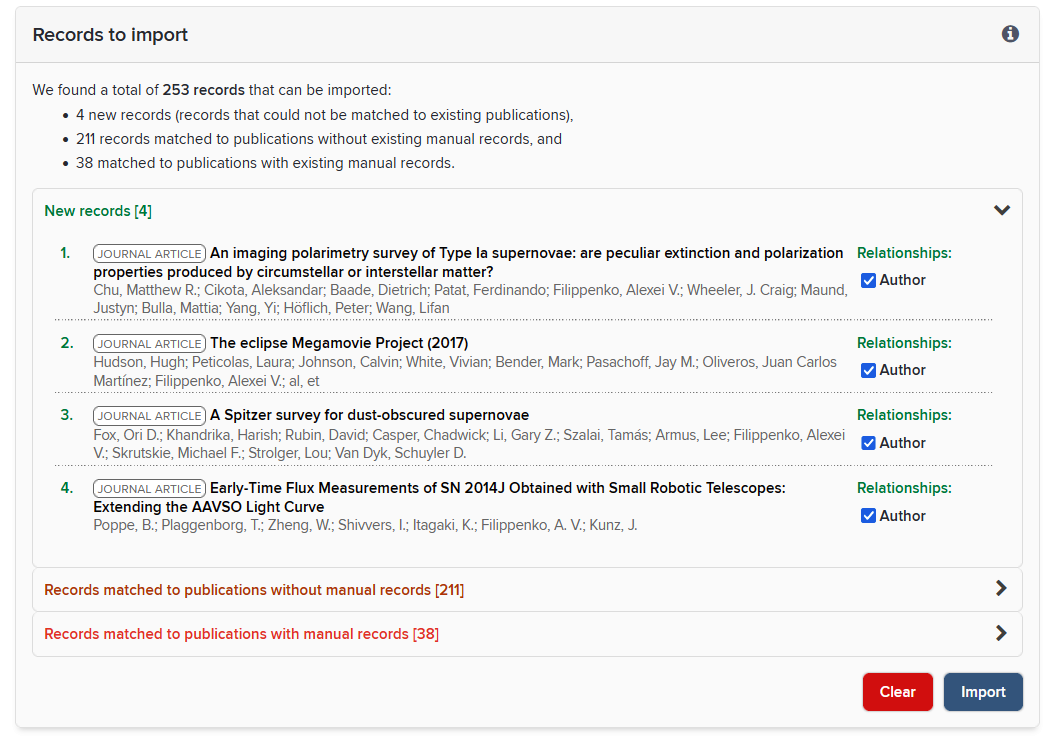
Matched to publications without manual records: These are references to publications that the UCPMS has previously found in external databases, but for which no other UC author has created a manual reference (“record”) in the UCPMS. If they look correct, they can be safely imported.
Matched to publications with manual records: These are publications that the UCPMS has previously found in publication databases, and which other UC authors have created a “manual” reference (“record”) in the UCPMS. Usually manual references are created during a BibTeX import (as you are doing now). If they look correct, they can be safely imported.
When you’re done verifying these lists, select the Import button.
Upload Your Publications to eScholarship
As mentioned above, the UCPMS regularly crawls publication databases searching for work by UC authors. When it finds what looks like a match, it puts a publication record in a user’s “Pending” list. Once a user verifies that they are the author of a particular publication, that publication is moved to their “Claimed” list. When you import publications using the process described above, those publications are automatically added to your “Claimed” list along with any other publications you have verified when previously using the system.
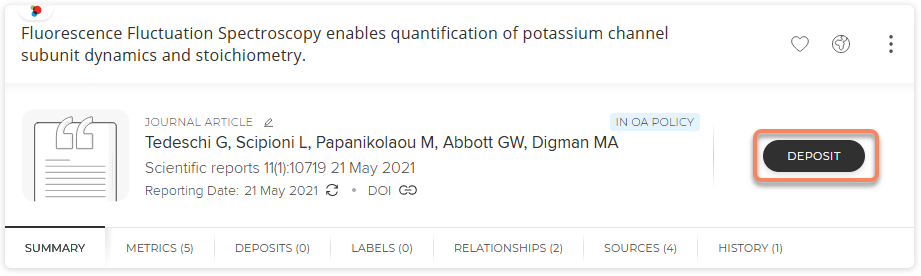
You can find the publications you just added using this quick link to your Claimed publications list, or by selecting Menu > Publications.
To upload a publication from your list to eScholarship, click the Deposit button next to the publication record.
On the right, select the “Browse” button and navigate to the Word or PDF file you have saved for that publication. Then select “Use this file” to upload the file to the system.
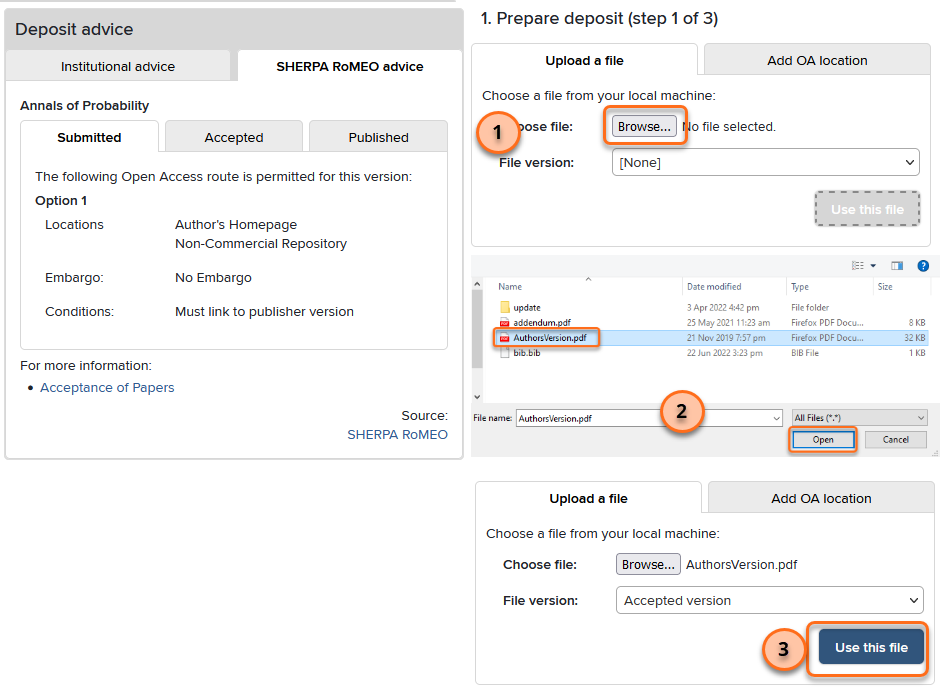
Optionally, the system lets you add additional information:
- You can choose an embargo, which delays public access to the publication you’re uploading. This feature is designed with new work in mind, for which there may be circumstances that warrant delaying access to the open version. You are likely uploading older work, and you can skip this embargo step.
- You can specify how you would like your article to be used by others with a Creative Commons (CC) license. If you are relying on the permission you got by writing to publishers and asking to use the version of record (VOR), you should skip the CC license step unless this was part of the permission you requested. If you are using your author’s accepted manuscript (AAM) and your article is recent enough to be covered by UC’s OA policies, you can choose a CC license. The UC Academic Senate recommends CC BY or CC BY-NC.
The final step is to click the “Deposit” button in the lower right.
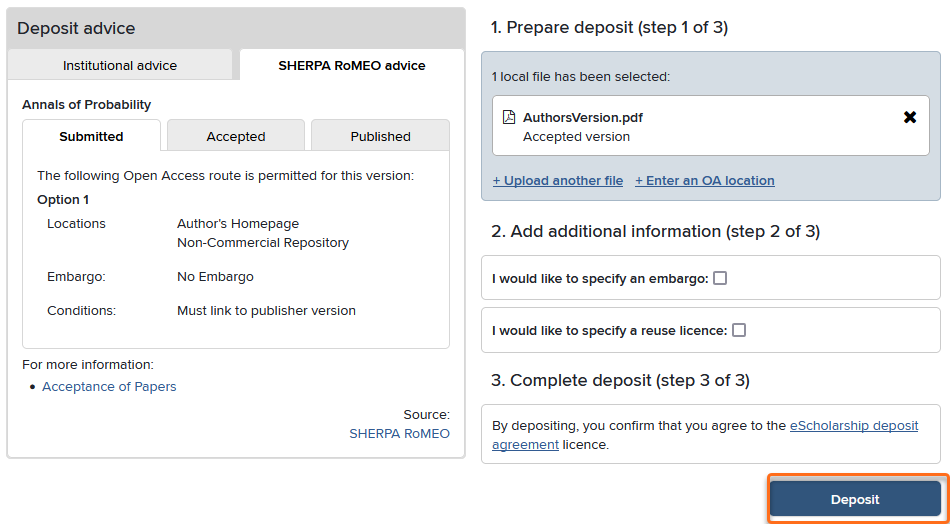
Once clicked, you will see the system actively depositing the file to eScholarship. The system will display a thank you message when the deposit is complete. Click “View your publication details” to view the list of files that you have deposited.
Once your deposit is live, you can get a link to its eScholarship location. From your list of “Claimed” publications, click on the title of the publication. Then scroll down to the Data sources section, and find the Public URL. Copy this link (it should start with “https://escholarship.org/uc/item/”) and add it to your tracking document so you know that the process is complete for this publication, and so you can find it later. If you’re using a spreadsheet, add a column for “eScholarship URL” to collect these links.
For a more detailed walkthrough of the deposit process that includes additional screenshots, you can visit the UC PMS help center.
Once you have deposited publications to the site, eScholarship will send you an email at the beginning of each quarter (January, April, July, October) which contains links to usage statistics so you can see how often your publications are being read. Learn more about these usage statistics in the eScholarship help center.